AC_WPNav - The Navigator
Executive Summary
The Waypoint Navigator (AC_WPNav) is responsible for generating the "Perfect Path" for the drone to fly. It does not fly the drone directly. Instead, it calculates a moving "Target Point" (Position, Velocity, Acceleration) that slides along the line between waypoints. The Position Controller then tries to chase this point.
Theory & Concepts
1. S-Curve vs. Linear Velocity
Most hobbyist drones use a trapezoidal velocity profile: they accelerate at a constant rate, cruise, and stop.
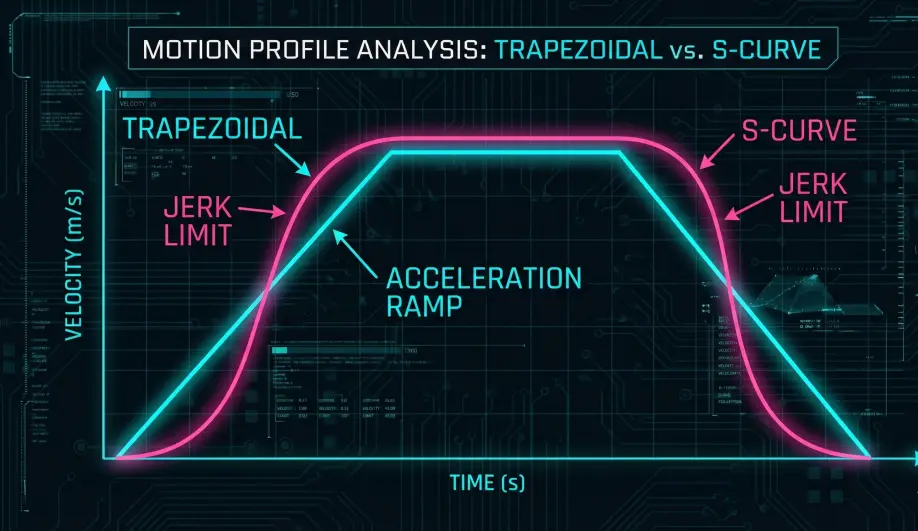
- The Problem: The transition from "Stationary" to "Accelerating" is a sudden step. This causes "jerk" which makes the gimbal twitch and stresses the motors.
- The S-Curve: ArduPilot uses a 3rd-order S-Curve. It ramps the acceleration itself.
- The Result: The movement looks like it has "Natural Weight" (Physics-based) rather than robotic commands.
2. Path Blending
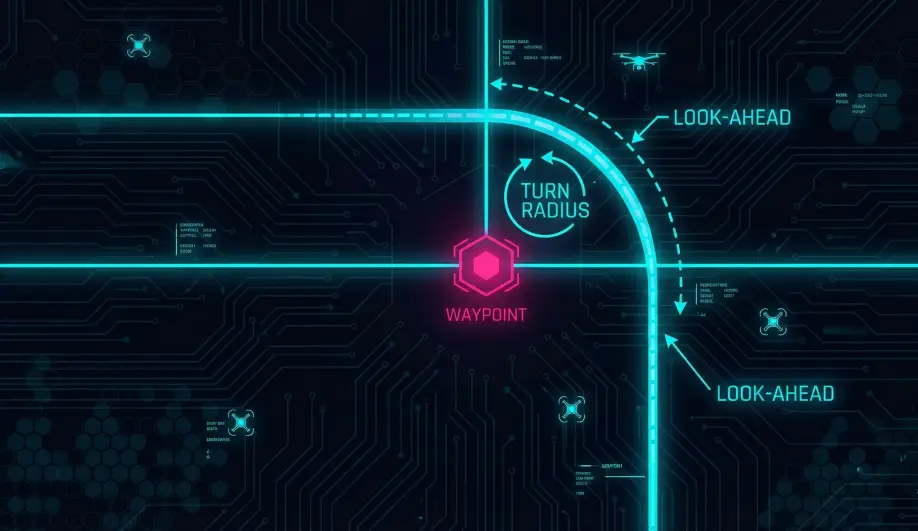
When navigating a series of waypoints, the aircraft doesn't stop at each point.
- Look-ahead: The navigator analyzes the next waypoint while flying the current one.
- Blending: It calculates a circular arc that connects the two lines. The radius of this arc is limited by the
WPNAV_ACCELparameter. - Why? Maintaining momentum is more efficient and provides smoother footage than a series of stop-and-turn maneuvers.
Architecture (The Engineer's View)
1. S-Curves (Cinematic Smoothness)
Early autopilots flew straight lines and stopped at every waypoint. ArduCopter uses S-Curves (Sigmoid velocity profiles).
- Jerk Limited: The path is calculated to limit "Jerk" (Change in Acceleration). This eliminates the robotic "twitching" seen in cheaper drones.
- Mechanism:
- It calculates the distance to the next waypoint.
- It generates a velocity profile that ramps up smoothly, cruises, and ramps down smoothly.
- Reference:
SCurveclass.
2. Splines (Hermite Curves)
If you use "Spline Waypoints" in your mission, AC_WPNav switches to a Cubic Hermite Spline solver.
- Logic: It defines a curved path that passes through the waypoint with a specific velocity vector (usually pointing to the next waypoint).
- Result: The drone flows through the point like a race car hitting an apex, rather than stopping and pivoting.
3. Cornering (The Leash)
When flying straight lines (standard Auto), the drone doesn't stop at the corner.
- Turn Radius: It calculates a "Turn Radius" based on speed and
WPNAV_ACCEL. - Cutting the Corner: As it approaches the waypoint,
AC_WPNavbegins "blending" the current line into the next line, creating a rounded corner. - The "Target": The computed target position moves along this rounded path.
Key Parameters
| Parameter | Default | Description |
|---|---|---|
WPNAV_SPEED |
500 | Max speed (cm/s). |
WPNAV_ACCEL |
100 | Max acceleration. Lower = smoother starts/stops. |
WPNAV_RADIUS |
200 | (cm) The radius at which the waypoint is considered "reached" and the turn begins. |
Source Code Reference
- Update Loop:
AC_WPNav::update_wpnav() - Path Calculation:
AC_WPNav::advance_wp_target_along_track()
Practical Guide: Tuning the Navigator
The "Stop and Go" behavior of ArduPilot Auto mode frustrates many new users. Here is how to make it flow.
The Physics of the Turn
ArduPilot will NOT violate your acceleration limit.
- Scenario: You are flying at 15 m/s (
WPNAV_SPEED = 1500). - Constraint: You limited acceleration to $1 m/s^2$ (
WPNAV_ACCEL = 100). - Physics: To turn 90 degrees at 15 m/s requires huge centripetal acceleration ($a = v^2 / r$).
- The Result: If
WPNAV_ACCELis low, the drone must calculate a massive turn radius (hundreds of meters) to stay within the limit. SinceWPNAV_RADIUS(the trigger distance) is usually small (2m), the drone realizes "I can't make this turn without slowing down." So it brakes to a near-stop, turns, and accelerates again.
The Fix
- Increase Acceleration: Set
WPNAV_ACCEL = 300($3 m/s^2$) or higher. This allows tighter high-speed turns. - Increase Radius: Set
WPNAV_RADIUS = 500(5m). This gives the drone permission to start the turn earlier.